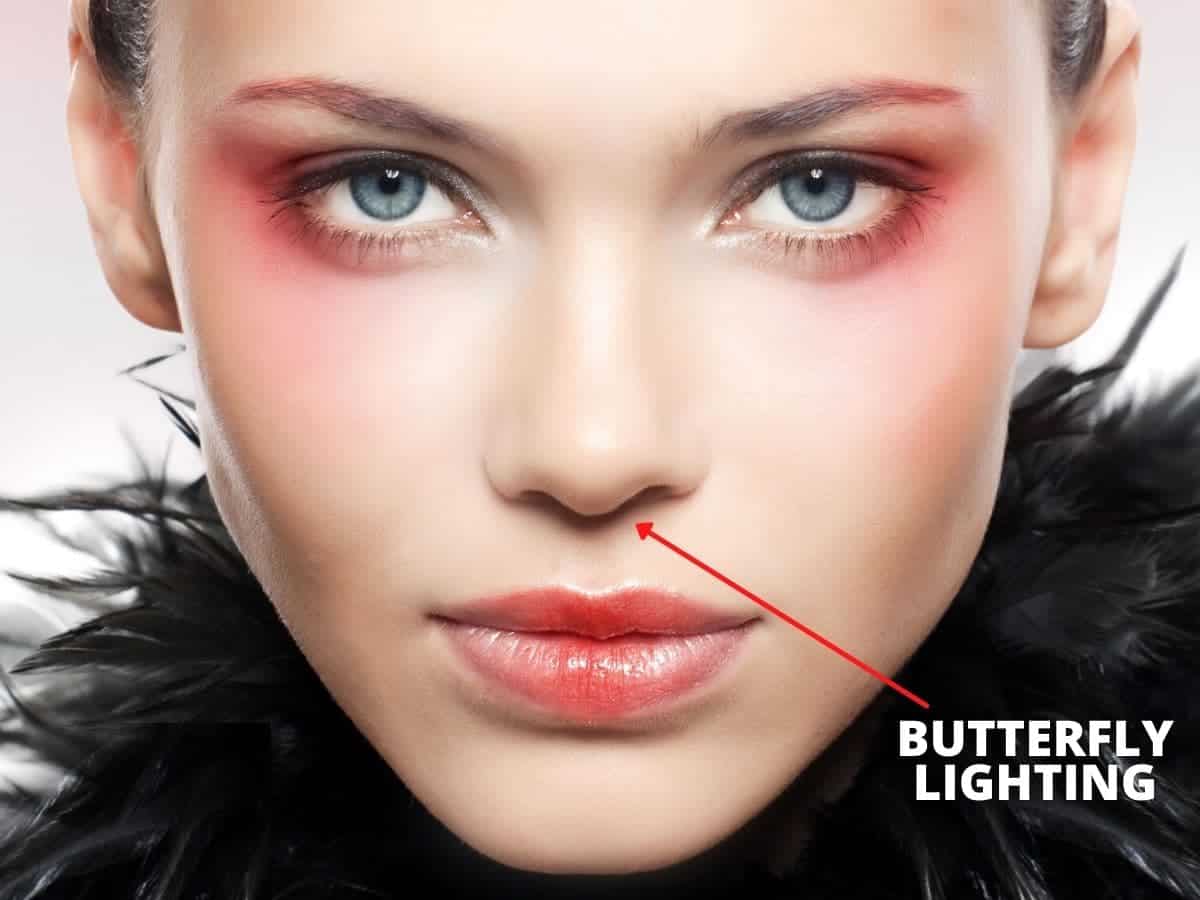
In portrait photography and cinematography, butterfly lighting is a technique that creates a butterfly-shaped shadow under the nose.
To capture stunning portraits and headshots, you must understand how to use your photography gear, light, and pose a subject.
One of the most impactful factors of a portrait is lighting.
By understanding different lighting patterns and how to use them, you’ll know how to convey an emotion with light.
Related article: How to create rim lighting
Plus, you’ll know which lighting pattern will make your subject look the most flattering. It’ll make you a better portrait photographer.
A popular and stunning lighting technique that you need to know is butterfly lighting.
Related article: What’s Rembrandt lighting?
The following covers what the butterfly lighting technique is, why it’s important, and how to use it. Also, you’ll find examples throughout for inspiration.
What’s butterfly lighting?
Butterfly lighting is a photography lighting pattern that forms a butterfly-shaped shadow under a subject’s nose.
It occurs when the key light is placed above eye or head level and points down towards a subject’s face.
Related article: The complete guide to flat lighting
The lighting pattern highlights and accentuates a subject’s cheekbones. Plus, the downward shadows under the nose and chin create a slimming effect.
It’s also called Paramount lighting, Hollywood lighting, and glamour lighting.
Often, the lighting is used in studio photoshoots, but it can be achieved outdoors, as well.
The best part about butterfly lighting is that it looks flattering regardless of a subject’s height, size, or face shape.
If you want to photograph dynamic portraits, use butterfly lighting.
Related article: Candid photography tips and examples
History of butterfly lighting
Butterfly lighting is known as Paramount, Hollywood, or glamour lighting because that’s where it originates.
The lighting pattern dates back to the early 1900s. It was used in the earliest glamour photos because it highlighted facial features and provided a slimming effect.
Soon after, it became a famous lighting pattern that everyone loved.
Today, butterfly lighting remains a go-to lighting pattern due to its flattering effects.
Related article: 15 essential tips for better headshots
Equipment needed to use the butterfly lighting technique
Aside from producing flattering portraits, butterfly lighting is appealing because it requires minimal equipment.
All you need is a camera, lens, and a light source. Ideally, use a high-resolution camera and quality lens for the sharpest images and an off-camera light, which is easy to adjust.
To get the best results, the following are all of the items you’ll need:
- Camera: Any high-resolution camera works.
- Lens: 35 mm to 135 mm depending on the available space and desired look.
- Tripod: Excellent for keeping your camera stabilized.
- Off-camera light source: Continuous LED lights are the best. You can also use a flash with a wireless trigger.
- Light stand: Air-cushioned light stands are ideal.
- Reflector: You can place a reflector under the subject’s face to lightly fill the shadows.
Portraits with butterfly lighting are often shot in studios. However, you can use it outdoors, too.
The best part is that you don’t need artificial light. While it’s challenging to achieve butterfly lighting with natural light, it’s possible.
If the light shines at an angle above your subject, the lighting pattern can be achieved. It requires patience.
To save you time and stress, use artificial light if you have it available.
How to use butterfly lighting for beautiful portraits
If you want to highlight a subject’s nose or cheekbones, use the butterfly lighting technique. Take the following steps to capture stunning portraits with the butterfly lighting pattern.
Step 1: Position your subject
Since everything else depends on your subject, the first step is to position the subject.
While you’re finding the best place for your subject to sit or stand, discuss poses and ideas for the photoshoot.
It’s also essential that you have a conversation with your subject to ensure they feel comfortable, which shows in the images.
Step 2: Set up the light source in front and above eye level of your subject
Once you’ve found the perfect position for your subject, it’s time to set up the lighting.
Place the light on a stand and put it in front of your subject, but behind your camera. It also needs to point towards your subject at a downward angle.
Start by positioning the light above eye level and adjust the height from there until you’ve found the ideal butterfly-shaped shadow.
If you want a dramatic effect, raise the light higher. For something more casual and soft, place a reflector under your subject’s face to fill the shadows.
Step 3: Adjust your camera’s settings to balance the exposure
The third step is to adjust your camera settings to achieve a balanced exposure.
Start by using a low ISO. Then, increase the shutter speed to freeze movement, and lastly adjust the aperture.
If you have specific camera settings you want to use and the image is too bright, reduce the intensity of the light source.
Step 4: Press the shutter button to take the photo
If the exposure is balanced and you’ve properly used the butterfly lighting technique, press the shutter to take the photo.
Take a look at it to ensure it’s what you envisioned. If needed, make adjustments to the light position, subject’s pose, or camera settings.
Examples of butterfly lighting
Butterfly lighting is easy to do and looks great on everyone. It’s hard to take a bad picture with it.
The following are examples of portraits that use butterfly lighting for you to get inspired and use as references.

In fashion and glamour photography, butterfly lighting is commonly used because it’s flattering.
It accentuates a subject’s cheekbones, has a slimming effect, and produces beautiful images.

Reflectors fill the shadows, making them less harsh. If you want a portrait or headshot that’s dramatic, skip the reflector.
The dark shadows from butterfly lighting result in a dynamic and stunning portrait.

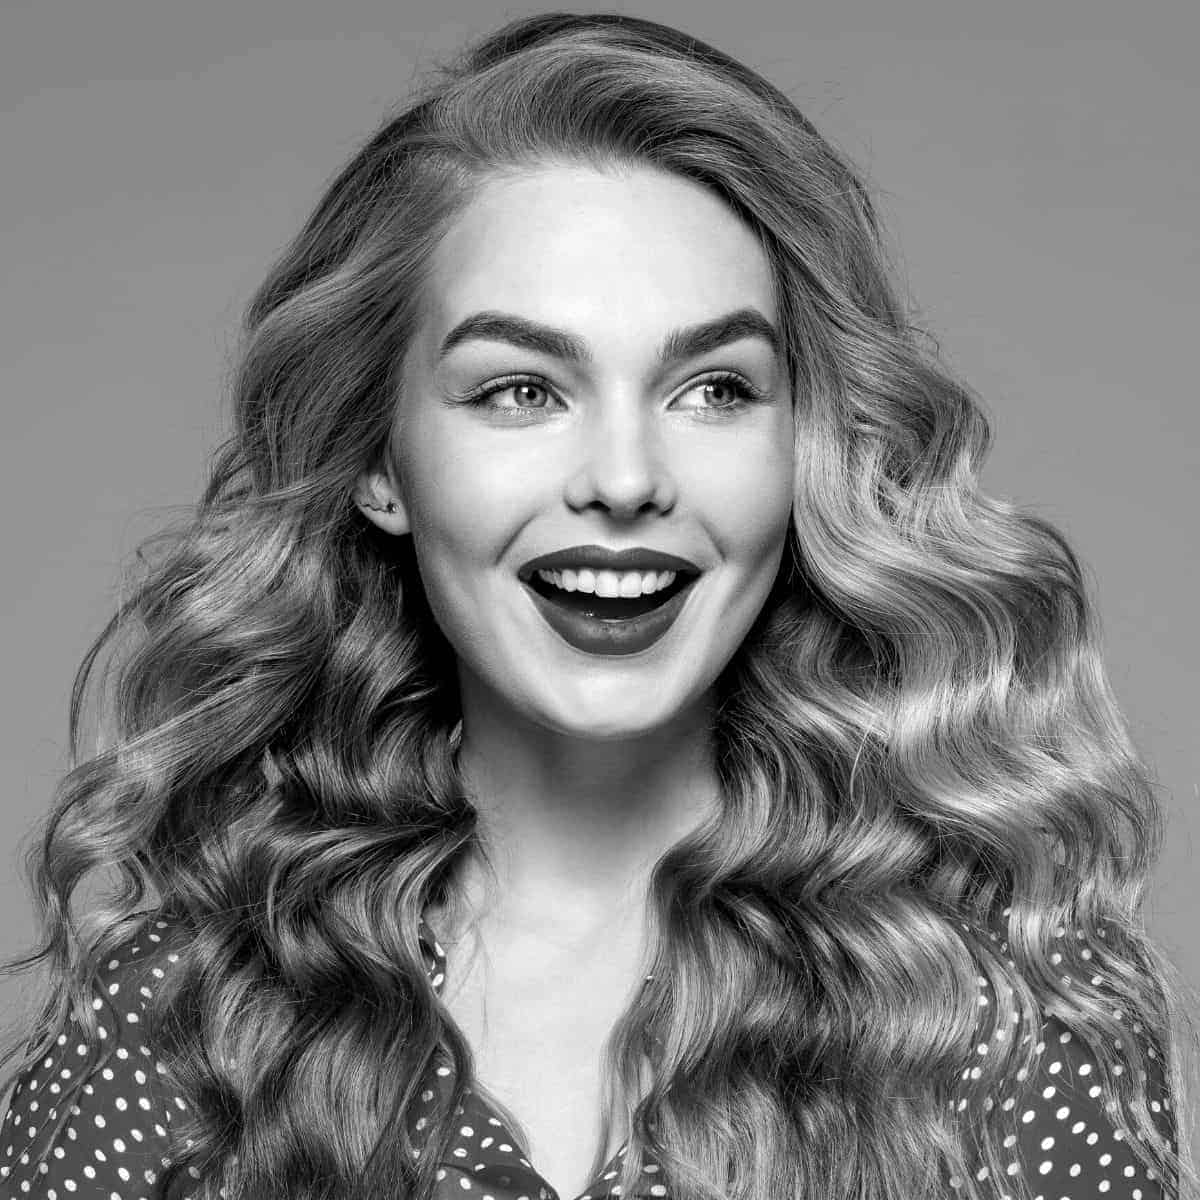
Another way to make the butterfly shadow stand out is to remove all colors. A black and white portrait accentuates the shadows and looks more dramatic.

Butterfly lighting also makes an image look cinematic or as if it’s from a movie or TV show.
Instead of a standard pose, try incorporating movement to make the portrait more interesting.
Conclusion
Start using the butterfly lighting technique in your portraits today.
It’s a glamorous and flattering lighting pattern that produces a butterfly-shaped shadow under a subject’s nose.
Butterfly lighting is easy to create, as you only need to point a key light down towards your subject. As a bonus, it minimizes wrinkles.
Overall, the lighting pattern is incredible and worth learning and implementing.
Featured image courtesy of Canva.